What makes it move?
Anatomy can become an extremely complicated subject. You could spend hours studying just one diagram. That is if you need to create an anatomically correct creature.
Depending on what you want to create you will need to research different things. Your main goals for your research will be to understand how your character should be built. What parts move, which parts do not, what are the limitations to the design, what will the character do?
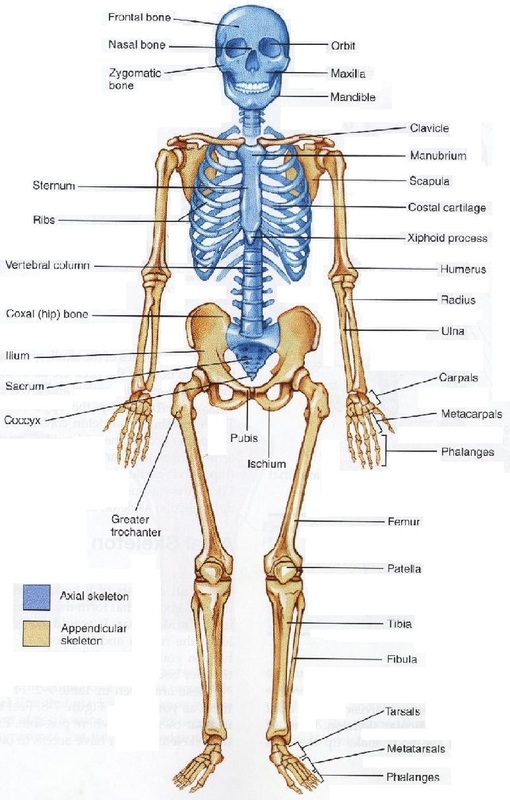
Some might say that you would need to memorize the name of every bone in the human skeleton, I disagree. I say you only need to know enough to convince us the viewers that you know what is under the skin.
Depending on what you want to create you will need to research different things. Your main goals for your research will be to understand how your character should be built. What parts move, which parts do not, what are the limitations to the design, what will the character do?
Some might say that you would need to memorize the name of every bone in the human skeleton, I disagree. I say you only need to know enough to convince us the viewers that you know what is under the skin.
When creating a human character there are certain things I plan for that will make understanding the anatomy easier. Check out this female character.
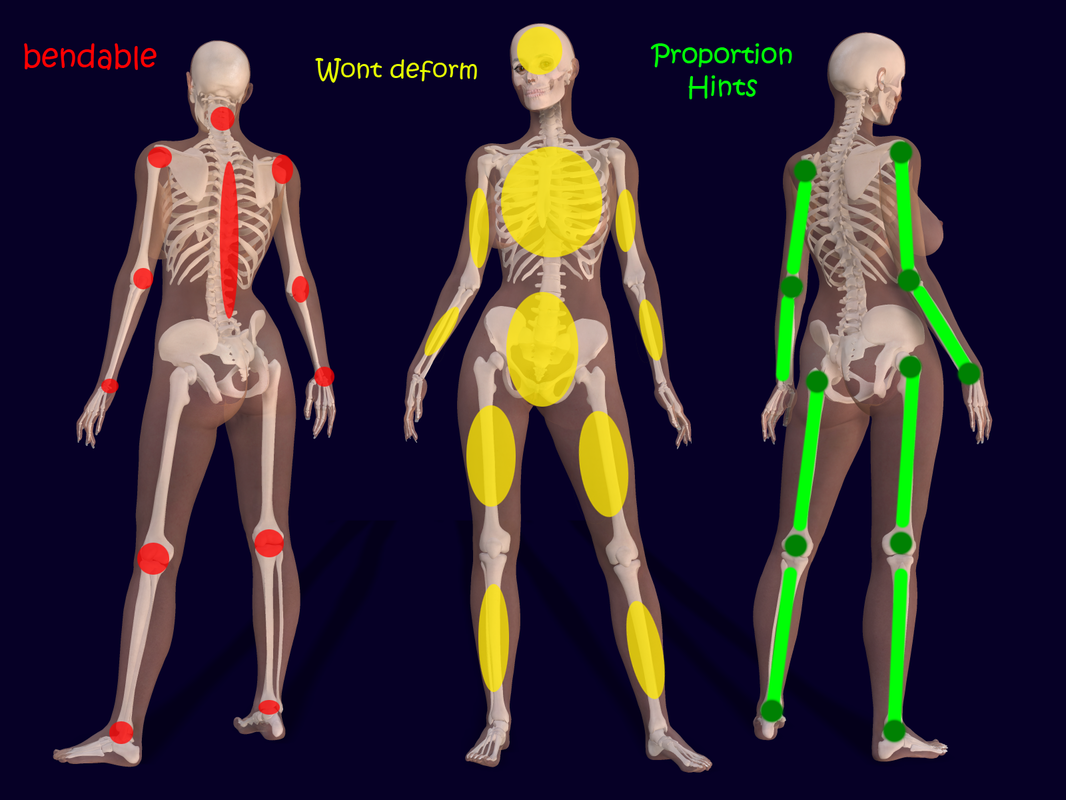
The red areas represents where the character will bend. The neck,
shoulders, elbows, wrists, knees, ankles, and spine are all natural points that allow for a range of motion. A range of motion is the limitation created by anatomy. For example the knee can bend all the way back even to far enough to touch the heel to the buttocks but as soon as you straighten your leg it will not bend any farther forward simply because the body is not supposed to work that way. So when you design your own character you should set limitations if
you want to create believable movements.
The yellow areas indicate what parts I plan not to move or deform. The bones in these areas are design to be firm and strong. They will
not change shape due to regular movement.
The green areas represent reference points for proper proportioning. The light green lines on the major bones show that they are almost the same length. Knowing this is important because you can make sure that your arms and legs are all the correct lengths. Adding shapes to connect the lines can be a quick way to build a temporary skeleton.
I am sure you will eventually want to create something other than a human. I will go over a couple other realistic creatures and a couple of abstract ones to show you how I would plan the anatomy for animation.

Here is an Ant with a unique anatomy. The dark green and light green areas are areas that would not have much movement. The red areas are where I would have joints for the moving parts. Being the neck area, between the
"trunk and metasoma", to allow the pinchers to move, and what I would call knees. If you have not notice we have not addressed what is inside of the Ant. Unless you plan on showing an animation of the inside of the ant your really don't need to concern yourself with these details.
"trunk and metasoma", to allow the pinchers to move, and what I would call knees. If you have not notice we have not addressed what is inside of the Ant. Unless you plan on showing an animation of the inside of the ant your really don't need to concern yourself with these details.
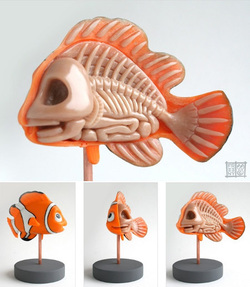
This great model of the character Nemo from Finding Nemo. Let us analyze what the artist has created. The interior of the fish showing the skull, jaw, spine, and guts will not move and should hold their shape during an
animation. The tail, back fin, side fins, and lower fin will most likely move. The inside the main body is mostly for looks and to show a professional thought
out design.
animation. The tail, back fin, side fins, and lower fin will most likely move. The inside the main body is mostly for looks and to show a professional thought
out design.
In Animation you can create anything! Each project will offer different challenges and it will be up to your skills as a Rigger to make your meshes move properly. The above examples were of organic creatures. They have their own ways of being built and can be researched online.
When it comes mechanical meshes you will have to think in a more mechanical way. You still need to address the main issue of how to make the model move but you also have to create it so it holds its rigged design. Take this character from the movie Red Planet.
When it comes mechanical meshes you will have to think in a more mechanical way. You still need to address the main issue of how to make the model move but you also have to create it so it holds its rigged design. Take this character from the movie Red Planet.
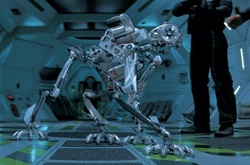
"AMEE" is a robot that supports Astronauts with their mission. She recons and is able to engage in combat. The designers (Animators not movie writers) made her parts so that they can move in a 360 degree rotation. Look at the knees, shoulders, ankles, toes, etc. You can create a simple bone layout like above mapping where pieces will move but unlike a in an organic object they are supposed to be metal. They must not deform when they move or come in contact with other objects. They should be attached though. It would be possible to create hundreds of separate pieces and move them independently but that would not be efficient. You must figure out a way to keep your character whole while still being manageable when you begin animating.
In summary, all designs that will eventually move will need to adhere to some kind of Anatomy structure. A organic creation will need to be Rigged to deform properly. This allows for the mesh (skin) to stretch and squash realistically. When rigging a mechanical design you must use your common sense to create the feel you want. Your objects movements should be set up to resemble mechanical movements. Parts can pivot in ways that organically wouldn't make sense and parts don't have to be connects. Your pieces can move freely and still give the illusion that they are one like in an extending pole. The best technique to create a working rig is to plan it out first and of course practice, practice, and practice.
In summary, all designs that will eventually move will need to adhere to some kind of Anatomy structure. A organic creation will need to be Rigged to deform properly. This allows for the mesh (skin) to stretch and squash realistically. When rigging a mechanical design you must use your common sense to create the feel you want. Your objects movements should be set up to resemble mechanical movements. Parts can pivot in ways that organically wouldn't make sense and parts don't have to be connects. Your pieces can move freely and still give the illusion that they are one like in an extending pole. The best technique to create a working rig is to plan it out first and of course practice, practice, and practice.
